Wiring can be daunting but once you begin, it all falls into place and before you know it you’ve got lights and it’s brilliant, you feel like a genius!
Ok, but how to get there? If you’re an aspiring mini electrician, there are lots of tutorials online, including how-to’s on GreenleafDollhouses.com and Cir-KitConcepts.com as well as YouTube to walk you through it. It seems harder than it really is!
For this project, I chose tape wire (my preferred method instead of round) and gathered all my wiring tools (brads, tester, needlenose pliers, awl, mallet, etc). Next… and I know this may seem like putting the cart before the horse, but it’s necessary… fit your furniture into your dollhouse. This is essential to determining where you want to add fireplace embers, outlets for lamps, hallway lights, porch lights, oven and refrigerator lights, etc.
Use a pencil to mark your walls and floors where you want these things, remove your furniture and begin laying your tape wire. Fit your furniture once more to be certain everything is where you want it to be and the tape wire is at the right height. You can always add another tape run if necessary.
I tend to over-wire because I change things around in my dollhouses so much that I would rather have too many possibilities than too few.
After I have laid my tape wire, and tapped in all those tiny brass brads to make my connections, I put a piece of Invisible Magic Scotch Tape (not the shiny stuff!) on every end run and over every pair of brads. This protects my tape and brads from the moisture of paint.
Next, and this is vitally important, take pictures! Photograph every room from all angles and save those photos for future reference. This will save you the hassle of removing wallpaper or paneling to see where your connections or tape wire is should you need to troubleshoot or add more lights in the future.
I then paint over my tape wire as this prevents the tape wire from showing through the wallpaper. It’s important to use Invisible Magic Scotch tape because the shiny Scotch tape will not accept paint or wallpaper paste.
In my next photo you can see the tiny mirror I use to help me see in tight spaces and the difference between painted and unpainted tape wire. Notice the difference between painted tape wire in the bedroom on the right and bare tape wire in the rest of the house?
Now you can begin the task of wallpapering which I will not go into because I have already laid it all out in an earlier blog post. I always begin with the ceiling first (I use ceiling wallpaper), then the walls. Usually, my flooring is installed last except when I am installing shiplap or paneling on the walls because I want the paneling to sit atop the edges of my flooring.
Sometimes, it’s easier to wire, wallpaper or work on certain areas of your dollhouse with the dollhouse on its side. In this next photo I had put the dollhouse on its side to rip out the dividing wall I had just installed between the dining room and kitchen. I was just about to glue the staircase in on the dining room side of this wall when I remembered Dad had said the kitchen pantry was below the stairs! How had I forgotten this? Grief will do that to you.
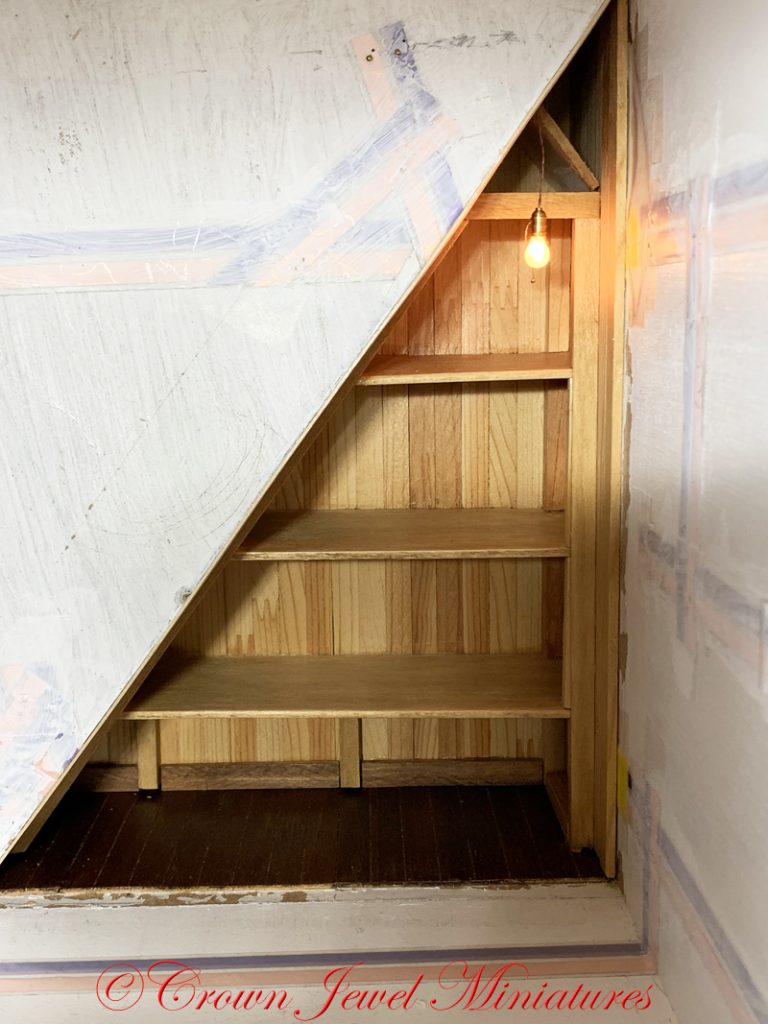
I performed surgery on my pristine wiring (argh!), removed the wall with a hammer (and a boatload of frustration), cut the wall on the diagonal (same angle as the staircase), glued the staircase onto the back of the wall and proceeded to build a pantry out of scrap wood left over from an old DuraCraft dollhouse kit!
Building a pantry, below stairs, with scrap wood was a challenge as I had never built anything like it before, but as in many aspects of my life when I was uncertain, I could hear Dad cheering me on, telling me you’ll never know what you can achieve until you try. Even if this turned out to be a disaster, I would at least know where I stood.
Because the area behind the stairs was so narrow, it was best for me to build the pantry onto the back of the stairs, then panel the dining room side of the stairs and slide the entire assembly into place as one unit. Amazingly I had bested the gremlins of the Pythagorean theorem and it fit! I glued it into place and then hung a “bare bulb” light fixture from Lighting Bug to chase away the shadows.
Fortunately building my pantry was not a disaster and I walked away from the worktable that night feeling Dad’s presence. “You can do it!” “Try something new!” Near or far, he is always with me.
Next up, painting and stenciling the kitchen floor!
♥ Robin
©Copyright 2023 Crown Jewel Miniatures. All rights reserved.
IGMA Artisan Robin Brady-Boxwell
CrownJewelMiniatures.com


